John Moyle Field Day 2014 At Mt Torbreck

Hi all,

Most of my activations are lightweight, and even more so these days, using a KX1 with a random wire antenna. Once a year, I go in an entirely different direction, and that is for the John Moyle Field day contest. This is a contest with both HF and VHF and up sections. It also rewards making seperate contacts on phone, CW and digital. It has a 6 hour section that can be timed for three rounds of contacts for each station, and they can be contacted per band.

It’s the VHF and up section that interests me. Currently that interest is on three bands 6m, 2m and 70cm.

A few years ago, I identified Mt Torbreck VK3/VN-001 as a suitable site to operate for the contest, and I went there in 2012, and again in 2013. This year, I sought to improve on previous year scored. I had dispensed with the Quadruple Quads that I had used on previous expeditions and built a 6 element yagi for 2m.

Access to the summit was the usual Barnewell Plains Rd up from Eildon Jamieson Rd. It’s a little rough, but there is no real trouble getting the Prius up here. As per last year, I would need two trips up to carry the gear.

Gear included:

  • FT-897
  • FT-817
  • Laptop and power adaptor that could take 12V in
  • Signalink USB for digital modes
  • A HT for 2/70 FM
  • 8 3S 5000mAh LIPOs
  • 3 3S 2200mAh LIPOs
  • A 12 V regulator
  • Various coax pieces both LMR195 and LMR400
  • Two 7m squid poles plus the lightweight 4.7m squid pole
  • Two 1.5m al pole sections
  • Turnstyle antenna for 6m
  • Coax based colinears for 2 and 70
  • A PVC based and squid pole mounted 6 element yagi for 2m

With the removal of the Quadruple Quads, it was less gear than last year. I had also taken up less battery capacity because I used little more than 50% of it last year.

As everything was carried in by hand and was battery powered, all my contacts here were SOTA contacts.

Conditions were nice during the setup. I finished the second trip up at about 11am and proceeded to setup all the gear.

Here’s the 2m colinear:

2m colinear squid pole mounted at Mt Torbreck

2m colinear squid pole mounted at Mt Torbreck

The 70cm colinear was built the previous day before the contest, and was then tested with the MiniVNAPro and Extender. It is a little hard to get the element spacing just right – I built it a little longer than a version from last year, but it still ended up a little out of band. SWRs of mid 3s to 4 are really too high, so I’ll need to make a match for it.

Zplots view of 70cm colinear

Zplots view of 70cm colinear

The gain is still very nice, and I get away with these high SWRs because the FT-897 does not develop as much power on 70. It also cuts back the power in presence of higher SWRs. Still, I need to get the SWR below 2 to give my radio an easier time and so a match will be needed – otherwise I would have to build the thing again, even longer per segment – I’m a little over building these things now!

Physically, the lightweight 4.7m squid pole was able to take the weight of the colinear, however, given that I was also attaching some LMR400 coax, I needed to support the weight of that against a tree, otherwise the pole would start to bend so that the bottom of the colinear was not far from the ground.

Next up, the 2m yagi:

2m yagi squid pole mounted at Mt Torbreck

2m yagi squid pole mounted at Mt Torbreck

In light winds, the setup for this was fine. I am going to need to guy it for stronger winds. I can guy it just below where the yagi is mounted. The mounting is a PVC pipe t piece on the pole, with the stem of the T allowing me to put on another T piece for the beam. I am going to modify the physical construction a little more along the lines of what Peter VK3PF has done, putting the elements through the beam, rather than using a wingnut to tie them onto the top of it. This will make setup and tear down simpler.

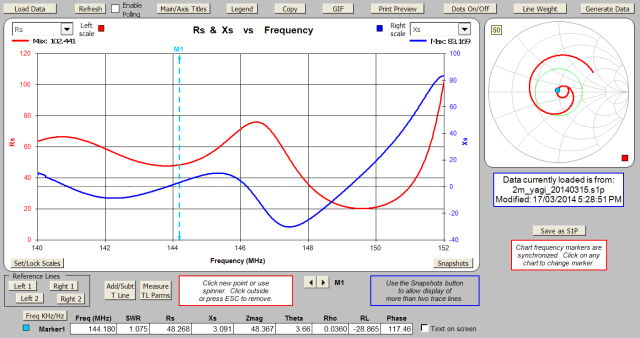
I was pretty happy with the measured results of this antenna:

2m yagi VNAPro measurements shown in Zplots

2m yagi VNAPro measurements shown in Zplots

This gives an SWR below 1.1 at 144.18MHz. The front to back was predicted by NEC2 to be over 30dB, and it was clearly high as I moved the yagi around. Predicted free space gain was about 16dBi. I was able to use it to work VK1DA/P during the contest, although by then, winds were very high and I had trouble keeping the thing up. So improvements for next year is a guying mount and physical improvements to the element mounting. I will also put in a BNC socket just after the common mode choke. The common mode choke on this antenna is simply 6 turns of the coax around the PVC beam right next to the feed point.

Last antenna up, the 6m turnstyle from last year. It’s not the most high gain antenna out there, but it does enough to put me in the game on 6m. I’m still thinking about whether I might put in a 2 element yagi to replace it next year, however the advantage of this thing is that I don’t need to do anything to adjust it during the contest. This is handy when in the tent because it’s raining outside.

6m turnstyle at Mt Torbreck

6m turnstyle at Mt Torbreck

You may notice the dark cloud in the above photo. Unfortunately, it was a sign of things to come.

So what’s missing. I have nothing horizontal polorisation for 70cm, and my plan for that is to build a 70cm yagi for next year. I’ll take the lessons learnt from building the 2m yagi this year. I am not going to bother with any vertical polorisation antenna for 6m.

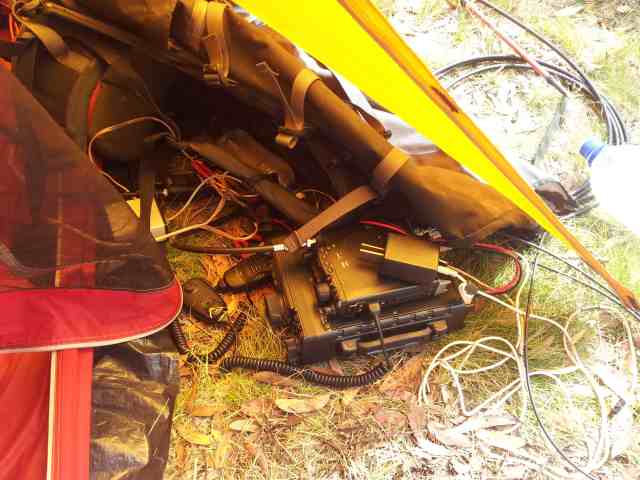
The radios were setup in the vestibule of the tent:

Radios in tent vestibule

Radios in tent vestibule

A look at the batteries – these were 3 parallel by 2 in series (effectively the cells are 6S3P) which then feeds a 12V regulator.

Mind the computer

Mind the computer

It does take a little bit of work to get the workspace clean enough in the small tent. The computer was here to provide VKCL logging during the contest and to run the PSK software (Fldigi). An alternative is to run something like DroidPSK on my phone or tablet through one of my radio interfaces.
20140315_130538s

I operated for about 4 hours in the contest. There were fewer portable stations out compared to last year, and a notable absence of picking up people participating in and around Melbourne using 2/70 FM HTs. I picked up a lot of contacts last year that way.

A number of strong showers passed through, but I heard from other contest stations further southwest that conditions were getting wild. There was sounds of distant thunder, and the radar looked bad out 100km to the west, so I pulled the plug. It felt a shame to end 2 hours early – I missed a whole available contest window. Conditions were looking not so good and there was lightning around, so I did not want to risk it.

I quickly pulled down the antennas and took the high priority gear (radios, computer, etc) down to the car first. On the way back up, a decent electrical storm came through with lightning every 3 or 4 seconds. Some strikes were within 500m. That storm passed when I got back up to the top, but now it was time to take down some of the metal gear. I actually thought about abandoning it, but banked on getting off the ridge before the next storm arrived. As it turned out, I was not quite off the ridge when the next squall came through. It was lightning every 2 or 3 seconds, the rain was driving hard and the track was a river under 30cm of flowing water. There was water absolutely everywhere. I was glad that I had taken down the electronic gear on the first trip and it was in the dry car! I still was not too happy about carrying 1.5m metal poles in the middle of an electrical storm. I felt much safer once off the ridge and about 20 minutes later the storm had passed. The rain then backed off to a more usual level. I was pretty wet for the drive home!

This was quite an experience, and hopefully the summit will be more forgiving next time and allow me to get a 6 hour activation in. I got 846 points, which I felt was not bad given the 4 hours operation, plus the lower number of portable stations. I look forward to next year with 2 yagis and a matched 70cm colinear to help extend the scores above my 2013 high.

Regards, Wayne VK3WAM

Designing a Phone/Radio interface

Hi all,

I have been interested in digital modes for some time. I purchased a SignaLink USB in the early days, even when I was an F-call, anticipating my full call would be issued before it arrived. This turned out to be the case. It would be a bummer if I could not use it! Note: in VK, F-calls may not transmit anything aside from SSB, AM, FM, PM. and hand generated (inc using an electronic keyer) CW.

My early days were focused on Easypal, a DRM based SSTV mode. I also did a little bit of playing around with RTTY, PSK and other narrow band based modes. Eventually SOTA started in VK, and I began to think about the possibility of doing digital modes on summit, but not taking a computer and the Signalink.

I use a Samsung Galaxy S2, and I began to think about what would be needed to use this for PSK and RTTY. Wolphi has some andriod apps on Google play for these modes, and also of interest, sells an interface. He also has put some designs up on the web here and here.

Version 1 of these interfaces uses a transformer to boost up tx audio from the phone device, so a transistor can be switched to pull down the PTT on the radio. Version 2 removes the transformer and instead relies on a voltage that is present on the microphone pin. There is also a bug in the schematic of v2, as the rx audio does not go to pin 1, it needs to go to pin 4, plus add a capacitor.

Separate to this, VK3XJM developed an interface between his FT-817 and his ipad. His initial try was broadly similar to the v1 Wolphi interface, and I then made him aware of v2. His next revision is similar to the Wolphi v2.

My design effort

Well, homebrewer extrodinare, I wondered if I would buy one of these interfaces, or build my own. Answer: design and build my own!

The first issue to consider is that line devices are supposed to present high impedance to the audio out device. While the mobile(cell) phones will think that they are driving headphones, these still will typically be 200ohms plus. The idea to use a transformer to boost up voltage is going against the principle of trying to minimise the load. So, I will not use the transformer approach. Both VK3XJM and Wolphi have found that this approach is barely viable anyway.

So the next step: time to find out more about this microphone voltage. It has been highlighted that this varies quite a bit between devices, and this can cause some of the above interfaces to not work so well. What is this voltage? It turns out that most devices will put this voltage on as part of the “Plug-in Power Supply” system. This is to provide power for Electret Condenser microphones. These devices have a permanently statically charged film over a metal plate. This forms a variable capacitor, which changes based on captured sound. The tiny signal is placed on the gate of a common source JFET, with the signal taken from the drain. “Plug-in Power Supply” provides the voltage on the drain to drive the JFET. Typically the voltage is 3V with a 6.8Kohm resister in series in the supplying device. This is not supposed to be a high current power source!

Unfortunately, there is no one standard for the voltage, plus the series resistance of this source. On the net, there are stories of voltages anywhere from 1.5V to 3V. Hmmmmmm, this variability could be a problem.

I took a hybrid circuit based on a combination of the VK3XJM and the Wolphi v2 design and put it together in gschem. After a bit of stuffing around to find libraries for various devices, I used gnetlist to use the gschem saved file to generate a spice netlist for spice simulation.

The first thing I found is that I was sucking just way too much current from the voltage on the pin! If the supply voltage was high, the circuit still worked, but it was marginal. Things needed to be improved. I also found on birdwatching web sites (these guys are using these electric condenser microphones) that many devices will not supply much more than 300uA, and my circuit was pulling far more than that. Time to put this circuit on a diet!

The biggest pull of current was the first transistor Q1. It was time to get the Ic down, to 200uA tops! Using some design principles in Ludeman Introduction to Electronic Devices and Circuits, I ended up selecting a 20k collector resistor. This then flowed through to a 1.1k emitter resister, although my choice here was a little arbitrary. I was still trying to keep Ve low, when Ludeman recommends Re to be 1/3rd of Rc. From there, the Ib can be determined, and Vbe found using a formula. This then sets what the two resistors used as a voltage divider should be. My resisters used were far higher than the initial circuit. Ludeman also provides formulas for the input, output and emitter bypass capacitors, based on what low pass is required. I chose 100Hz. Its quite low, but it means that there should be no problems doing PSK at 500hz AF. I was prepared to fall back to 200Hz if required, but the really high impedances made capacitor choices easier. Note that Ludeman points out that the emitter bypass capacitor is not just set by Re, but there is also a AC path out of the base of the transistor. This path can be quite significant in the capacitor sizing.

The ngspice simulators showed the Q1 switching nicely on TX input, while presenting very low load to the signal. Next up was dealing with the PTT switching transistor Q2. The FT-817ND has a 11k load from a 5V source on the PTT pin based on the circuit diagram. Both the initial circuits basically rectify the AC output of Q1, filter it with a cap and feed this to the base of Q2. I first used Schottkies like VK3XJM. Hey the lower drop across the diode should help? I could not get the ngspice model working properly, so I went to ordinary 1N3891 diodes. I got these working nicely. I also bumped up a resister on the base to 20k, but also Q2 effectively provides a high resistance to the tiny weany current that is going through the base. This also allowed me to slice the filter cap right down to 100nF. This is the only cap that actually has to be charged in this circuit, and the early high current versions of this circuit required much higher values of this cap to work. It also meant that this cap was presenting too much load to the “Plug-in Power Supply” system.

So what I have now will work quite happily on anything from 1.2V to 3.5V, and I have not bothered testing outside these ranges ’cause it should cover just about everything. Once the voltage is below about 1.5V, it takes around 80ms to pull down the PTT on a 500Hz AF source, but it will pull it down. I think it would even work with a 1V supply! At 3V, it basically pulls it down in 2ms, which is on the first signal waveform! I am happy with these results, because this circuit should be very robust.

Current requirements: At 3.5V, it pulls around 80uA average, 140uA peak from the supply. Well within the 300uA for a mono electric! When the supply is 1.2V, it pulls 70uA peak and 20uA average. This circuit has certainly come out trim after its diet!

Where there any consequences in using such a tiny filter cap at 100nF. Well, yes, but they don’t matter. At 3.5V supply, the ripple is 200mV, but the signal at the base is plenty high enough, and the thing is so current limited that it does not matter than Vbe is 0.9V to 1.1V!

When the voltage is 1.2V supply, the ripple is hardly anything. So 100nF is perfectly fine for the filter cap on the base of Q2.

I have a screen shot of the circuit below. Click for full size.

v1 Phone Radio interface circuit

I plan to build one of these on variboard. If people were interested, I could design either a through hole or a surface mount circuit PCB for it and make a kit available.

Regards, Wayne VK3WAM

EDIT: I replaced the ordinary diodes with Schottkies as their lower voltage drop across the diode helps the robustness of the circuit. The updated circuit diagram, with light background, shown below, can be clicked on.
Updated interface circuit between an FT-817 and a phone device (iPhone, Android)

EDIT2: Updating of the schematic as microphone audio in (to the phone) is taken from pin 4 as discussed in the text. I had kept the old one up, but Gerald DL3KGS noticed the difference.

Schematic as implemented on PCB

Schematic as implemented on PCB

Trans Tasman Contest

Saturday the 21st of June saw the Trans Tasman contest on 160m phone and 160/80m CW and digital on. It was a 6 hour contest with the best 5 hours to count.

The Eastern Mountain District Radio Club (EMDRC) was going to enter this, so I thought I would get involved doing CW and digital. I have a SignaLink USB on my FT-897 at home and so I put my hand up to focus on 80m.

Operating Station setup

I would have liked to have posted photos on this post, but I was busy contesting. Someone else took some photos, so hopefully they will show the station and I will edit this post at a future time.

My operating station consisted of my FT-897 brought in from home, a MFJ1025 noise canceller, a MFJ T-match manual tuner, a LDG ZPro-II auto tuner and the SingaLink USB. The antenna was an inverted-V full length for 80 metres. I had low SWR on the antenna without using the T-match, but found I had significantly less interference from 160m operations if I left the tuner in.

What was the ZPro doing? I had this tune a 20 metre beam for 80m to use as a noise sense antenna for the MFJ noise canceller. This seemed to work. The noise canceller was not able to lower the general noise floor, but what it was good for was getting rid of specific QRM that appeared throughout the night. The ZPro was affected by RF in the shack from 160m operations, so I had to put it in manual mode to not try to retune every time there was a 160m operation. I wonder what I was exposing myself to in the shack last night!

Anderson Poles

The EMDRC has been encouraging members to use Anderson poles There is nowhere in the shack to plug them in however, so lucky I brought a cable with rings on one end and Anderson Poles on the other. I still had to wedge these in to the power supply as it wanted lugs, but oh-well. It worked and I was able to use Anderson Poles for the rest. From the converter, I had a 3 way Y-plug, with the FT-897 plugged into this. I had a second 3 way y-plug, which was a little overkill, but plugged into this was the ZPro and the noise canceller. I could have easily plugged in 2 more things if required – so the setup is very flexible for use here at the EMDRC away from my own shack, and also for my QRO and QRP SOTA setups.

Digital observations

Digital modes that are AFSK based – i.e. all of them where a sound card is used to feed a SSB type mode on a typical rig – need the rig to stay as linear as possible. It is very important that there is no processor or ALC action. I had my rig showing ALC on its meter and increased TX level as much as possible, but not so much to activate the ALC. On the SignaLink, this ended up being around “10am” on the TX potentiometer. Other stations were transmitting with clear ALC action on their signal. This causes splatter. One station had so much splatter on their PSK31 signal that it was taking up nearly a full 1KHz for a signal that is supposed to only take 31Hz. This is multiple orders of intermodulation! I could not decode this signal – and sent them a message to turn down their TX! They did so, and while the splatter was still bad, it was at least then decode-able. A number had one order of splatter – giving a head and shoulders look. You want all of your TX energy in what is supposed to be there, and the shoulders are a waste of energy. A few stations had PSK-31 stations that had no observable splatter.

PSK31 does not tolerate almost any drift. Even on 80m there was one particular station that drifted 10Hz or so, and this was enough to cause decoding to stop until I re-clicked on the signal to move the decoding bars. This has implications for use of PSK on higher bands, especially VHF/UHF where this issue would be more critical. Some have suggested for this reason that PSK is not suitable for VHF work.

Contest Ops

In the end, I worked like a slave for the full 6 hours. My software was not that good at decoding CW, so lucky my brain can at least reasonably decode 20wpm. I operated the first 20 minutes or so of each hour CW, then the middle 20 minutes digital and the last 20 minutes CW again. The rules allowed for digital stations to be re-worked every half hour (once in the first half hour, and again in the second half hour), so I tried to take advantage of this – which mostly I was able to.

Most contest digital ops where PSK31. There was some RTTY near the start and occasionally later. One station was using Hell, but I had already worked them in that time slot. The key with Hell is to turn the software “squelch” all the way down. Hell is like reading a fax – the signal processing is in your brain.

In the end, contest activity was reasonably engaging. I found running got more contacts, so I spent about 75% of the time running. It was the first time ever that I had actually chased CW stations. This is because when I activate CW in SOTA, I am always the “running” station. I picked up the chaser caper without too much trouble. Of course in CW, one should not transmit on the running stations frequency, but offset 100Hz or so.

Having a narrow IF filter defiantly helps in both CW and digital. I would normally operate using the wide filter, but if something was happening 1KHz away that would affect the AGL, then I could quickly switch to the 300Hz Collins filter to get rid of it. The wide filter is good for seeing a broad picture on the waterfall when AGL action is not taking away the signal that I am interested in. I left the FT-897 menu on the selection where I could switch between the two filters with one press of the button.

In the end, it was an enjoyable contest. I had 87 non DUP contacts (1 DUP), so not too bad for a first effort.